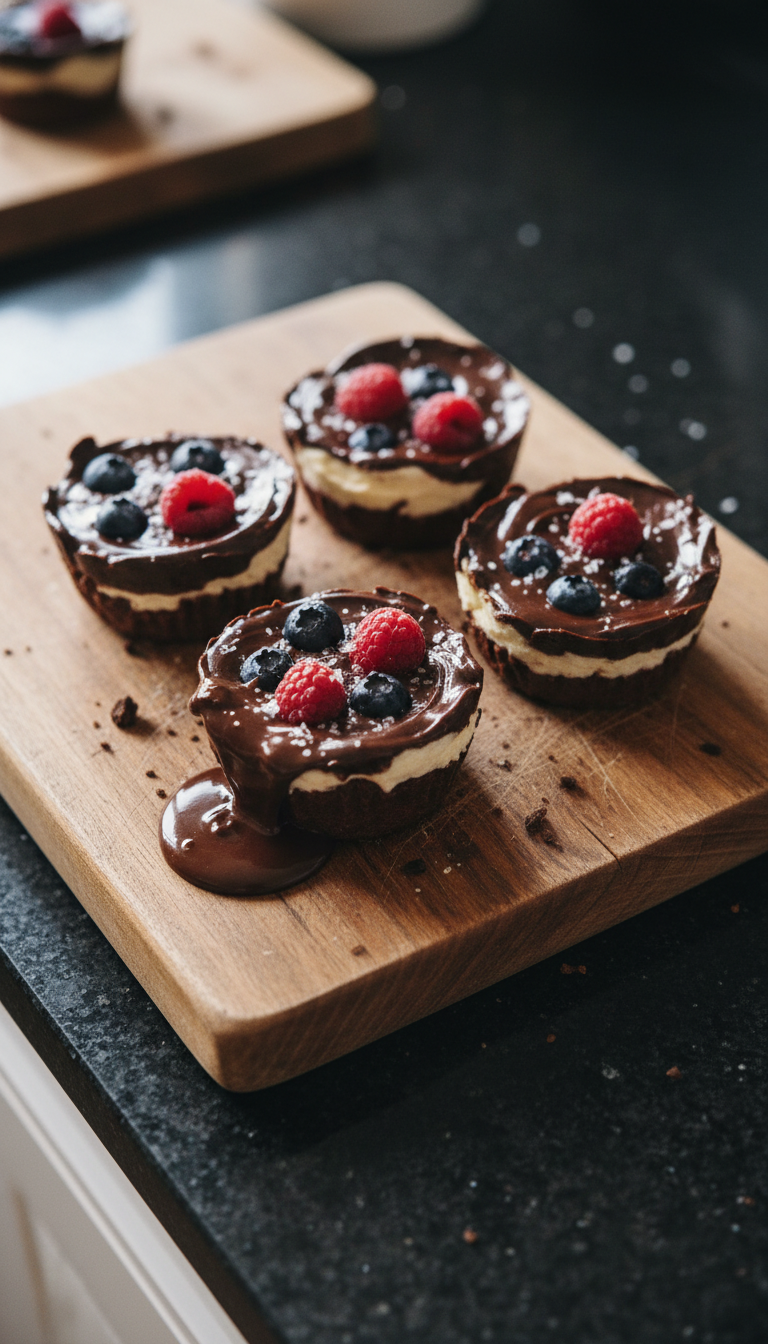
Cacao & Berry Chocolate Cups
Highlighted under: Baking & Desserts
I absolutely love creating these Cacao & Berry Chocolate Cups because they perfectly combine rich chocolate with the freshness of berries. Each bite is a delightful indulgence that feels special yet surprisingly easy to make. With minimal ingredients and a short prep time, I often whip these up for parties or cozy nights at home. Plus, the vibrant colors of the berries make them an eye-catching treat on any dessert table. Trust me, once you try them, you’ll be reaching for more!
Making Cacao & Berry Chocolate Cups has become a cherished tradition in my kitchen. The process is straightforward: melt some quality dark chocolate, pour it into molds, and let it set with delightful berries nestled inside. I’ve experimented with different types of berries, and I can confidently say that strawberries and raspberries offer the best flavor balance.
The trick to ensuring a smooth consistency is tempering the chocolate properly. This not only allows for a glossy finish but also helps the chocolate snap perfectly when you bite into it. It’s an inspiring blend of texture and taste that leaves everyone wanting more!
Why You'll Love This Recipe
- Rich chocolate flavor paired with fresh berry tartness
- Customizable with your favorite berries and toppings
- Great for sharing at parties or as a delightful snack
Key Techniques for Perfect Chocolate Cups
The most crucial step in making these Cacao & Berry Chocolate Cups is melting the chocolate correctly. Use a double boiler setup—place a heatproof bowl over a pot of simmering water to gently melt the chocolate. Stir continuously until it's smooth and glossy. Be careful not to let any water mix with the chocolate, as this can cause it to seize. If you find your chocolate becoming thick, you can add a teaspoon of coconut oil to help thin it out.
When preparing your molds, ensure that you cover the bottoms evenly with the melted chocolate. Use a spoon or a pastry brush to spread it out, reaching up the sides slightly. This creates a sturdy base that won’t easily crack when you pop them out. Once you’ve created the first layer, placing the molds in the refrigerator for 10 minutes is essential. Look for a slight firming, as this indicates it's ready to hold the berries.
Berry Variations and Substitutions
While strawberries and raspberries shine in this recipe, feel free to get creative with other berries. Blueberries and blackberries are excellent substitutes if you prefer different flavors. You can also consider using dried fruits like cranberries for a chewier texture. Just ensure that whatever berry you choose is adequately chopped or whole in a way that allows for even distribution and coverage in your chocolate cups.
If you're looking for a sugar-free or dairy-free alternative, there are options available. Dark chocolate can be replaced with sugar-free chocolate chips, or a dairy-free chocolate like carob. Additionally, nut butter can replace a layer of chocolate—just remember to adjust the quantities accordingly to maintain texture and balance. When experimenting, keep a close eye on the setting time as variations in ingredients can change how long they need to chill.
Ingredients
Gather these simple ingredients for a delightful treat.
Ingredients
- 200g dark chocolate
- 100g fresh strawberries, chopped
- 100g fresh raspberries
- 12 silicone cupcake molds
Ensure your ingredients are fresh for the best flavor!
Instructions
Follow these steps to create your delicious chocolate cups.
Melt the Chocolate
In a heatproof bowl, melt the dark chocolate over a pot of simmering water, stirring until smooth. Remove from heat and let it cool slightly.
Prepare the Molds
Using a silicone cupcake mold, spoon a layer of melted chocolate into each mold, ensuring the bottom is well covered. Place in the refrigerator for 10 minutes to set.
Add Berries
Once the first layer has set, remove from the fridge and add a layer of chopped strawberries and a few raspberries into each cup. Pour more melted chocolate over the berries to fully cover them.
Chill and Serve
Place the molds back in the refrigerator for another 10-15 minutes until fully set. Once set, gently pop the chocolate cups out of the molds and serve.
Enjoy your homemade Cacao & Berry Chocolate Cups!
Pro Tips
- For added crunch, consider sprinkling some crushed nuts on top before chilling. Experimenting with different chocolate types can also yield delicious results.
Serving Suggestions
These Cacao & Berry Chocolate Cups are visually stunning on their own, yet you can enhance their appeal further. Consider garnishing them with a sprig of mint or a dusting of powdered sugar for added presentation. If you’re serving them at a gathering, try placing them on a decorative platter surrounded by fresh berries for a berry theme that looks inviting and delicious.
For a more indulgent touch, serve these chocolate cups with a side of whipped cream or a scoop of vanilla ice cream. The creaminess will balance the tartness of the berries beautifully, creating a delightful contrast. Alternatively, drizzle a bit of melted chocolate over the top just before serving for an extra layer of flavor and decoration.
Storage Tips
These chocolate cups can easily be made ahead of time. Once fully set, store them in an airtight container in the refrigerator for up to a week. Make sure to separate layers with parchment paper to prevent them from sticking together. If you plan to make a larger batch, consider freezing them; they can last frozen for up to a month.
When you're ready to enjoy the frozen chocolate cups, simply transfer them to the refrigerator for a few hours to defrost. Avoid using the microwave to speed up the process, as this can cause the chocolate to lose its texture and sheen. Proper storage will preserve their flavor and texture, allowing you to indulge at a later date.
Questions About Recipes
→ Can I use different types of chocolate?
Absolutely! Milk chocolate or white chocolate can also be used, though it will change the flavor profile.
→ How long do these chocolate cups last?
They can be stored in an airtight container in the fridge for up to a week.
→ Can I freeze the chocolate cups?
Yes, they can be frozen for about a month. Allow them to thaw in the fridge before serving.
→ What other fillings can I use?
You can get creative! Try using nuts, granola, or other fruits like blueberries or kiwi.
Cacao & Berry Chocolate Cups
Created by: The Nibblevista Team
Recipe Type: Baking & Desserts
Skill Level: Beginner
Final Quantity: 12 cups
What You'll Need
Ingredients
- 200g dark chocolate
- 100g fresh strawberries, chopped
- 100g fresh raspberries
- 12 silicone cupcake molds
How-To Steps
In a heatproof bowl, melt the dark chocolate over a pot of simmering water, stirring until smooth. Remove from heat and let it cool slightly.
Using a silicone cupcake mold, spoon a layer of melted chocolate into each mold, ensuring the bottom is well covered. Place in the refrigerator for 10 minutes to set.
Once the first layer has set, remove from the fridge and add a layer of chopped strawberries and a few raspberries into each cup. Pour more melted chocolate over the berries to fully cover them.
Place the molds back in the refrigerator for another 10-15 minutes until fully set. Once set, gently pop the chocolate cups out of the molds and serve.
Extra Tips
- For added crunch, consider sprinkling some crushed nuts on top before chilling. Experimenting with different chocolate types can also yield delicious results.
Nutritional Breakdown (Per Serving)
- Calories: 150 kcal
- Total Fat: 10g
- Saturated Fat: 6g
- Cholesterol: 0mg
- Sodium: 5mg
- Total Carbohydrates: 15g
- Dietary Fiber: 2g
- Sugars: 8g
- Protein: 2g